Part 1: Get Started Creating a Modern WordPress Theme
At this point you should already have your WordPress site installed on your local machine. I recommend using XAMPP. Let’s dive in!
WordPress 5.9 introduced Full Site Editing (FSE) which allows users control over the entire site, and not just a little section of the page. Instead of PHP templates in the theme, we’ll be using html files packed with Gutenberg blocks that can be fully customized, within the limitations of the block settings of course.
Step 1: File Creation
Create a new folder inside “wp-content/themes” called “custom”.
Inside of your new “custom” folder, create the following folders and files:
- style.css
- theme.json
- templates/index.html
- parts/header.html
- parts/footer.html
Step 2: Initialize the Theme
This step tells WordPress there is a working theme I can now use on my site.
Open up your style.css and add the following CSS comment, using your own name of course.
/*
Theme Name: Custom
Author: Brandi
Version: 1.0
*/
If you visit your admin area and navigate to Appearance > Themes you will now see your “Custom” theme. You can of course name it whatever you wish. It doesn’t need to match the folder name. You can now activate your new theme. The main site will be blank for now, but that’s okay.
There is a lot more information you can add to this comment section if you wish. Read about the options in the WordPress handbook.
Step 3: Adding a Screenshot
You probably won’t have a screenshot yet unless you happen to have a mock-up of what you’re going to build. You can always use your company logo. It’s kind of free advertising so the client will come back to you next time.
I tested various file types: png, jpg and I even threw a gif in there and it worked. That could be really fun. I’ve never seen a theme developer use a gif before.
Dimensions don’t seem to matter too much either. However, if it’s too small it will grow and become pixelated. If it’s portrait it may cut off more than you expect. For reference, I’m using an image that is 880px wide by 660px tall.

Step 4: The Template Files
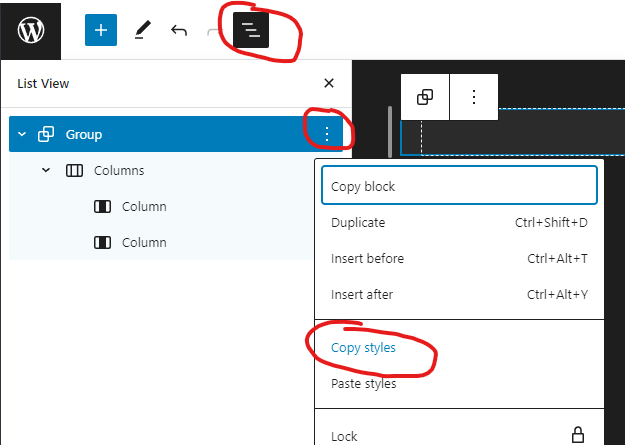
When creating template files you start by creating a new test page in the admin area of WordPress. I like to start with a group block and add the blocks I need inside. You can then select the root block, the group, and copy the block styles and paste into your templates. I will provide some samples below.
The Header
Open up parts/header.html. The following code contains a starter with the site title on the left, and the site navigation on the right.
<!-- wp:group {"style":{"spacing":{"padding":{"top":"var:preset|spacing|30","right":"var:preset|spacing|30","bottom":"var:preset|spacing|30","left":"var:preset|spacing|30"}}},"layout":{"type":"constrained"}} -->
<div class="wp-block-group" style="padding-top:var(--wp--preset--spacing--30);padding-right:var(--wp--preset--spacing--30);padding-bottom:var(--wp--preset--spacing--30);padding-left:var(--wp--preset--spacing--30)"><!-- wp:columns {"verticalAlignment":"center","isStackedOnMobile":false} -->
	<div class="wp-block-columns are-vertically-aligned-center is-not-stacked-on-mobile"><!-- wp:column {"verticalAlignment":"center","width":"33.33%","layout":{"type":"default"}} -->
		<div class="wp-block-column is-vertically-aligned-center" style="flex-basis:33.33%"><!-- wp:site-title {"level":0,"fontSize":"large"} /--></div>
		<!-- /wp:column -->

		<!-- wp:column {"verticalAlignment":"center","width":"66.66%"} -->
		<div class="wp-block-column is-vertically-aligned-center" style="flex-basis:66.66%"><!-- wp:navigation {"ref":39,"layout":{"type":"flex","justifyContent":"right"}} /--></div>
		<!-- /wp:column -->
	</div>
	<!-- /wp:columns -->
</div>
<!-- /wp:group -->
The Footer
The parts/footer.html file below contains simple a group and a simple paragraph.
<!-- wp:group {"style":{"spacing":{"padding":{"top":"var:preset|spacing|50","right":"var:preset|spacing|50","bottom":"var:preset|spacing|50","left":"var:preset|spacing|50"}}},"layout":{"type":"constrained"}} -->
<div class="wp-block-group" style="padding-top:var(--wp--preset--spacing--50);padding-right:var(--wp--preset--spacing--50);padding-bottom:var(--wp--preset--spacing--50);padding-left:var(--wp--preset--spacing--50)">
	<!-- wp:paragraph -->
	<p>© 2023 Brand Name. All rights reserved.</p>
	<!-- /wp:paragraph -->
</div>
<!-- /wp:group -->
The Index
Open up the templates/index.html file. This is the very minimum template needed to get your theme working. We’ll toss a Query Loop block inside of a Group block as well as some of the needed sub-blocks that go with a post. Lastly, we’ll include the header and footer at the top and bottom of the template. Every template should do this.
<!-- wp:template-part {"slug":"header","tagName":"header"} /-->

<!-- wp:group {"tagName":"main","style":{"spacing":{"margin":{"top":"var:preset|spacing|70","bottom":"var:preset|spacing|70"}}},"layout":{"type":"constrained"}} -->
<main class="wp-block-group" style="margin-top:var(--wp--preset--spacing--70);margin-bottom:var(--wp--preset--spacing--70)"><!-- wp:query-title {"type":"archive","align":"wide","style":{"spacing":{"margin":{"bottom":"var:preset|spacing|50"}}}} /-->

	<!-- wp:query {"queryId":0,"query":{"perPage":6,"pages":0,"offset":0,"postType":"post","order":"desc","orderBy":"date","author":"","search":"","exclude":[],"sticky":"","inherit":true},"displayLayout":{"type":"flex","columns":2},"align":"wide","layout":{"type":"default"}} -->
	<div class="wp-block-query alignwide"><!-- wp:post-template {"align":"wide"} -->
		<!-- wp:post-featured-image {"isLink":true,"width":"100%","height":"max(15vw, 30vh)","align":"wide"} /-->

		<!-- wp:post-title {"isLink":true} /-->

		<!-- wp:post-excerpt /-->

		<!-- wp:post-date {"isLink":true} /-->

		<!-- wp:spacer {"height":"50px"} -->
		<div style="height:50px" aria-hidden="true" class="wp-block-spacer"></div>
		<!-- /wp:spacer -->
		<!-- /wp:post-template -->

		<!-- wp:query-pagination {"paginationArrow":"chevron","layout":{"type":"flex","justifyContent":"space-between"}} -->
		<!-- wp:query-pagination-previous {"label":"Newer Posts"} /-->

		<!-- wp:query-pagination-next {"label":"Older Posts"} /-->
		<!-- /wp:query-pagination -->
	</div>
	<!-- /wp:query -->
</main>
<!-- /wp:group -->

<!-- wp:template-part {"slug":"footer","tagName":"footer"} /-->
Step 5: Initial Look and Feel
WordPress 5.8 came out with the theme.json file which loads in your setting on both the front-end and the admin area of the site. This is so fantastic as it cuts down on the amount of work we have to do to make the backend look good.
Open up your theme.json file and add these very basic lines.
{
	"version": 2,
	"styles": {
		"color": {
			"background": "dodgerblue",
			"text": "#fff"
		}
	}
}
The version is required and the whole file will not work without it. It specifies what version of the theme.json you are using. We are using 2.
This is such a small fraction of what this file can do. There is a lot to cover so we’ll go into that in another article.
Save and Preview
Take a look at the front-end of your website. You should now see a blue background with white text. It gets cooler. Go to the admin area and create a new page or post. You should see the same color scheme. If you’ve used WordPress in the past and didn’t use a builder, you know how awesome this is!

Step 6: Creating a Palette
Most, if not all, blocks allow the user to change the color of the background, text and links. There is a default set of colors the user sees. We’ll probably want to change those colors. If you’re developing for a client, we want them to be able to select from a set of colors that are in line with their brand.
Here’s an image of the default palette
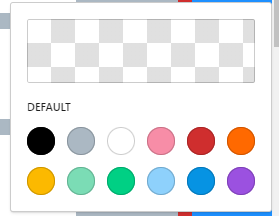
Let’s update the theme.json file to include a new palette, along with a few other settings. First, we’ll enable some appearance tools that will give the user more control. Then we’ll create the palette which will tell WordPress to create some CSS variables for us. Then we’ll use those variables to overwrite the background and text color we created initially. We’ll also set up some default colors for the links. Lastly, we’ll add references to the template parts for the header and the footer.
{
"$schema": "https://schemas.wp.org/trunk/theme.json",
"version": 2,
"settings": {
"appearanceTools": true,
"useRootPaddingAwareAlignments": true,
"layout": {
"contentSize": "1200px",
"wideSize": "95%"
},
"color": {
"palette": [
{
"name": "Dark",
"slug": "dark",
"color": "#2b2b2b"
},
{
"name": "Light",
"slug": "light",
"color": "#efefef"
},
{
"name": "Green",
"slug": "green",
"color": "#1D594E"
},
{
"name": "Yellow",
"slug": "yellow",
"color": "#F2CB05"
},
{
"name": "Yellow Orange",
"slug": "yellow-orange",
"color": "#F29F05"
},
{
"name": "Orange",
"slug": "orange",
"color": "#F28705"
},
{
"name": "Red",
"slug": "red",
"color": "#F23030"
}
]
}
},
"styles": {
"color": {
"background": "var(--wp--preset--color--dark)",
"text": "var(--wp--preset--color--light)"
},
"elements": {
"link": {
"color": {
"text": "var(--wp--preset--color--yellow)"
},
":hover": {
"color": {
"text": "var(--wp--preset--color--yellow-orange)"
}
}
}
}
},
"templateParts": [
{
"name": "header",
"title": "Header",
"area": "header"
},
{
"name": "footer",
"title": "Footer",
"area": "Footer"
}
]
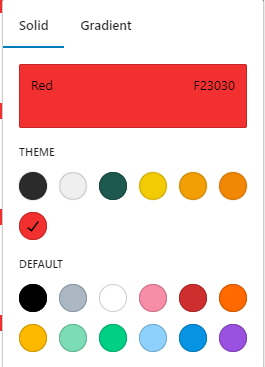
}The new palette now shows up everywhere.
Well, that covers some of the basics. Check back again as we continue on adding the remaining templates. If you need more information we covered this article in a video below.