Part 3: Custom Templates
In part 2 we created a few templates for certain pages along with a fallback template with index.html. Now let’s create some custom templates.
Add the following code to your theme.json inside the initial brackets {}.
	"customTemplates": [
		{
			"name": "sidebar",
			"title": "Content with Sidebar",
			"postTypes": [
				"page",
				"post"
			]
		}
	],
The name key is what we’ll name the file after. The title is what the user will see when they want to change the template of a post. The postTypes key tells WordPress which types can use this new style. You can of course add any new types in there. For example Modern Tribe events would go in as “tribe_events.” If you don’t add the above code to the JSON file it will still work, but it will just be named after the file and could be used everywhere.
Inside your “templates” folder let’s add sidebar.html. I will create some code for you, but of course you can create your own using the same method covered in Part 2. Just don’t forget to add your header and footer template parts.
<!-- wp:template-part {"slug":"header","tagName":"header"} /-->
<!-- wp:group {"tagName":"main","style":{"spacing":{"margin":{"top":"var:preset|spacing|50"}}}} -->
<main class="wp-block-group" style="margin-top:var(--wp--preset--spacing--50)"><!-- wp:group {"layout":{"type":"constrained"}} -->
<div class="wp-block-group"><!-- wp:post-featured-image {"height":"300px","overlayColor":"contrast","align":"wide","style":{"spacing":{"margin":{"bottom":"var:preset|spacing|50","top":"calc(-1 * var(u002du002dwpu002du002dpresetu002du002dspacingu002du002d50))"}}}} /-->
<!-- wp:post-title {"level":1,"style":{"spacing":{"margin":{"bottom":"var:preset|spacing|40"}}}} /-->
</div>
<!-- /wp:group -->
<!-- wp:group {"style":{"spacing":{"padding":{"left":"var:preset|spacing|40","right":"var:preset|spacing|40"}}},"layout":{"type":"constrained"}} -->
<div class="wp-block-group" style="padding-right:var(--wp--preset--spacing--40);padding-left:var(--wp--preset--spacing--40)"><!-- wp:columns {"verticalAlignment":null} -->
<div class="wp-block-columns"><!-- wp:column {"width":"75%"} -->
<div class="wp-block-column" style="flex-basis:75%"><!-- wp:post-content {"layout":{"type":"constrained"}} /--></div>
<!-- /wp:column -->
<!-- wp:column {"verticalAlignment":"top","width":"25%","layout":{"type":"default"}} -->
<div class="wp-block-column is-vertically-aligned-top" style="flex-basis:25%"><!-- wp:group {"layout":{"type":"flex","orientation":"vertical","justifyContent":"left"}} -->
<div class="wp-block-group"><!-- wp:latest-posts {"excerptLength":32,"displayAuthor":true,"displayPostDate":true,"align":"left"} /-->
<!-- wp:tag-cloud /-->
<!-- wp:social-links {"iconBackgroundColor":{},"openInNewTab":true,"size":"has-large-icon-size","style":{"spacing":{"blockGap":{"top":"var:preset|spacing|20","left":"var:preset|spacing|20"}}},"className":"is-style-default","layout":{"type":"flex","justifyContent":"left"}} -->
<ul class="wp-block-social-links has-large-icon-size is-style-default"><!-- wp:social-link {"url":"https://www.facebook.com","service":"facebook"} /-->
<!-- wp:social-link {"url":"https://www.twitter.com","service":"twitter"} /-->
</ul>
<!-- /wp:social-links -->
</div>
<!-- /wp:group -->
</div>
<!-- /wp:column -->
</div>
<!-- /wp:columns -->
</div>
<!-- /wp:group -->
</main>
<!-- /wp:group -->
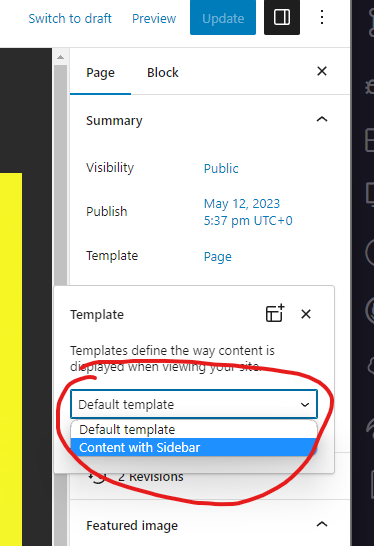
<!-- wp:template-part {"slug":"footer","tagName":"footer"} /-->Visit any page or post and look for “Template” on the right side of the page. You can click to change it and set it to our new Sidebar.
That’s it! You have created your new custom template.